See my previous post on this topic, Legal Television and Movies for Expats
Roku
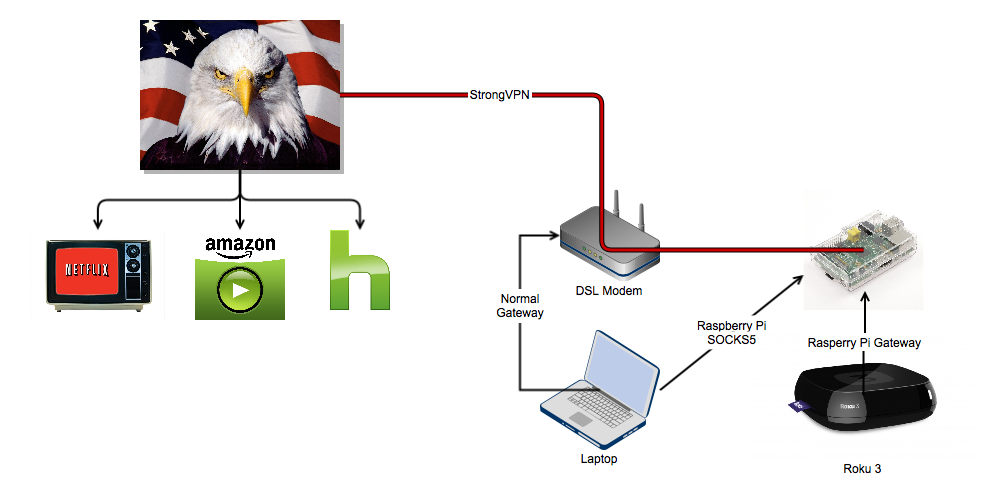
Roku is one of the more popular streaming appliances in the U.S. It has “channels” such as Netflix, Amazon, Hulu, et al. It can be a key component in legally streaming your favorite content from home, but to use it abroad, you’ll need to configure a VPN gateway that the Roku can use.
I decided to use my Raspberry Pi for that purpose. I use StrongVPN as my provider, and I was able to import the Roku 3 device from Amazon in the U.S.
Important! Don’t connect your Roku to your WLAN until you’re VPN gateway is configured, otherwise Roku uses geolocation and will configure your device for whatever country you’re in – which limits your access significantly to channels. If you already did this, you can factory reset it and register it with a different account.
Picking a Linux Distro
I decided on Red Sleeve Linux, an Arm clone based on the sources of Red Hat Enterprise Linux. Any Linux distro will do, but I picked Red Sleeve because I’m familiar with the RHEL family, and it’s a bit more stable/static than Pidora. I just want to set the device and mostly forget about it.
The rest of these instructions are specific to RHEL (and Pidora probably too).
After installing RSEL, there’s two key things to keep in mind:
- You may need to set the date before creating any users/changing any passwords. Even though there's ntpdate sync command in rc.local, it doesn't seem like it worked for me on firstboot. So after you get the network up and running, run ntpdate -s nist.time.gov, for example.
- Red Sleeve ships mistakenly with a persistent net rule -- so your NIC is going to come up as eth1. To fix it, remove the entry from /etc/udev/rules.d/70-persistent-net.rules and reboot.
Configure VPN
My VPN provider offers PPTP and OpenVPN. I initially chose PPTP, but it had lousy performance on my Pi. I didn’t spend too much troubleshooting it, and just switched over to OpenVPN. There’s a number of good reasons to pick OpenVPN over PPTP.
I’ve provided instructions for both types anyway.
1. PPTP Instructions
Install PPTP Software
yum -y install pptpConfigure PPP Peer
In /etc/ppp/peers/strongvpn for example, input the relevant username/password/vpn server info:
pty "pptp $VPN_SERVER --nolaunchpppd --debug"
name $USERNAME
password $PASSWORD
remotename strongvpn
require-mppe-128
require-mschap-v2
refuse-eap
refuse-pap
refuse-chap
refuse-mschap
noauth
debug
persist
maxfail 0
defaultroute
usepeerdns
Configure up/down scripts
/etc/ppp/ip-up.local runs when you’re connected to the VPN. I do this to have it set the default route and enable IP forwarding.
/sbin/route add default ppp0
/bin/echo 1 > /proc/sys/net/ipv4/ip_forward
/etc/ppp/ip-down.local runs when you’re disconnected from the VPN connection. I don’t want any Internet traffic going out except through the VPN, so I disable IP fowrarding at disconnect:
/bin/echo 0 > /proc/sys/net/ipv4/ip_forwardConnect to the VPN
In /usr/share/doc/ppp-*/scripts, you’ll find “pon” and “poff” which are easy to use scripts to connect to the VPN. I put these in /usr/local/sbin and mark them +x.
After to connect:
pon strongvpnTo disconnect:
poff strongvpn2. OpenVPN Instructions
OpenVPN is simple, except you need to enable EPEL on RSEL. Create epel.repo in /etc/yum.repos.d/ with this content:
[epel]
name=epel-6
failovermethod=priority
baseurl=http://ftp.redsleeve.org/pub/yum/epel/RPMS
enabled=1
metadata_expire=0s
gpgcheck=0
Install OpenVPN:
yum -y install openvpnDrop your config files and certificates into /etc/openvpn/, and connect:
openvpn --config /etc/openvpn/strongvpn.ovpn --daemonDisconnect:
killall -SIGINT openvpnI haven’t played much with the auto disabling ip forarding and such.
Configure iptables
Below is a simple firewall config I made with Red Hat’s tool (it automatically sets up stateful firewall and such, no need to write rules manually - yay!). You should install it to pull in all the iptables dependencies RSEL seems to be missing:
yum -y system-config-firewall-tuiIn /etc/sysconfig/iptables (simply replace ppp0 with tun0 for OpenVPN):
*nat
:PREROUTING ACCEPT [0:0]
:OUTPUT ACCEPT [0:0]
:POSTROUTING ACCEPT [0:0]
-A POSTROUTING -o ppp0 -j MASQUERADE
COMMIT
*filter
:INPUT ACCEPT [0:0]
:FORWARD ACCEPT [0:0]
:OUTPUT ACCEPT [0:0]
-A INPUT -m state --state ESTABLISHED,RELATED -j ACCEPT
-A INPUT -p icmp -j ACCEPT
-A INPUT -i lo -j ACCEPT
-A INPUT -i eth0 -j ACCEPT
-A FORWARD -m state --state ESTABLISHED,RELATED -j ACCEPT
-A FORWARD -p icmp -j ACCEPT
-A FORWARD -i lo -j ACCEPT
-A FORWARD -i eth0 -j ACCEPT
-A FORWARD -o ppp0 -j ACCEPT
-A INPUT -j REJECT --reject-with icmp-host-prohibited
-A FORWARD -j REJECT --reject-with icmp-host-prohibited
COMMIT
And restart iptables, and make sure to chkconfig iptables on.
Configure DHCP
Unfortunately, I found out the Roku provides no way to set a static network configuration. I have no idea why they chose to do things that way, but this means you’ll need to disable the DHCP server on your wireless router and setup one on the Pi to explicitly give your Roku the VPN gateway.
Note the hardware address is printed on the bottom of the Roku.
Install the dhcp package:
yum -y install dhcpExample config:
subnet 192.168.1.0 netmask 255.255.255.0 {
        option routers                  192.168.1.1;
        option subnet-mask              255.255.255.0;
        option domain-search            "bitbin.de";
        option domain-name-servers      8.8.8.8;
        range                           192.168.1.10 192.168.1.100;
}

host roku {
   hardware ethernet B8:3E:DE:AD:BE:EF;
   fixed-address                   192.168.1.101;
   option routers                  192.168.1.2; # Raspberry Pi
   option subnet-mask              255.255.255.0;
   option domain-search            "bitbin.de"
   option domain-name-servers      8.8.8.8;
}
Start streaming!
After the VPN connection is up, and your DHCP server is working, go ahead and connect the Roku to your network and go through the registration process.
SOCKS Proxy Trick
One more thing to mention is, it’s likely you’ll want to use the VPN connection sometimes on your laptop, or desktop computer – but not 100% of the time. You can also setup a SOCKS proxy on the Pi very easily, and then use Firefox + FoxyProxy to set up rules only for netflix, amazon, etc.
You could install something like Delegate, or Dante, but the easiest thing to do is install screen:
yum -y install screenAnd start and SSH connection in screen like this:
ssh youruser@localhost -D 192.168.1.2:3128Viola! SOCKS5 proxy. Don’t forget to update Firefox to use DNS through the SOCKS proxy – by going to about:config, and set network.proxy.socks_remote_dns to true.